


A properly sized dropper post can completely change your ride for the better. Obtaining optimal saddle height with the push of a lever can help improve pedaling efficiency and make for easier climbs. At the same time, maximizing the travel of your dropper can help move your saddle as far out of the way as possible during descents, which means you’ll have a safer outing. Knowing how to size a dropper post is the first step towards improving your ride and having more fun on your bike, so let’s hop to it.
Setting Proper Saddle Height
To get started with finding your ideal dropper post size, you first need to find your proper saddle height (if your saddle is already at your desired height skip ahead to the next section of this article). Setting your saddle height may take some time as it is largely based on personal preference and depends on the length of your legs. However, a good rule of thumb is that your heel should maintain contact with your bottom pedal while your leg is fully extended without forcing you to lean to one side. This way, when you’re pedaling on the ball of your foot you know there will always be at least a slight bend in your knee. Setting proper saddle height is important as it helps prevent joint and muscle pain while also allowing the rider to generate the most efficient pedal stroke.
If you’re unable to fully extend your legs while pedaling, try raising your saddle in small increments until you are comfortably able to do so. If you find that your hips are rotating from side to side to maintain contact with your pedals while pedaling, try lowering your seat in small increments until you are no longer leaning. Repeat these steps until you find your sweet spot.
Let's Get Measuring, Measuring
Now that your saddle is set to the most efficient height, let’s get to measuring for your future dropper post. We’ll be looking for three numbers, in particular, that will impact the size of your future dropper post: full extension, max insertion, and overall length. Before we get out the measuring tape actuate your dropper so it is fully extended.
Full Extension
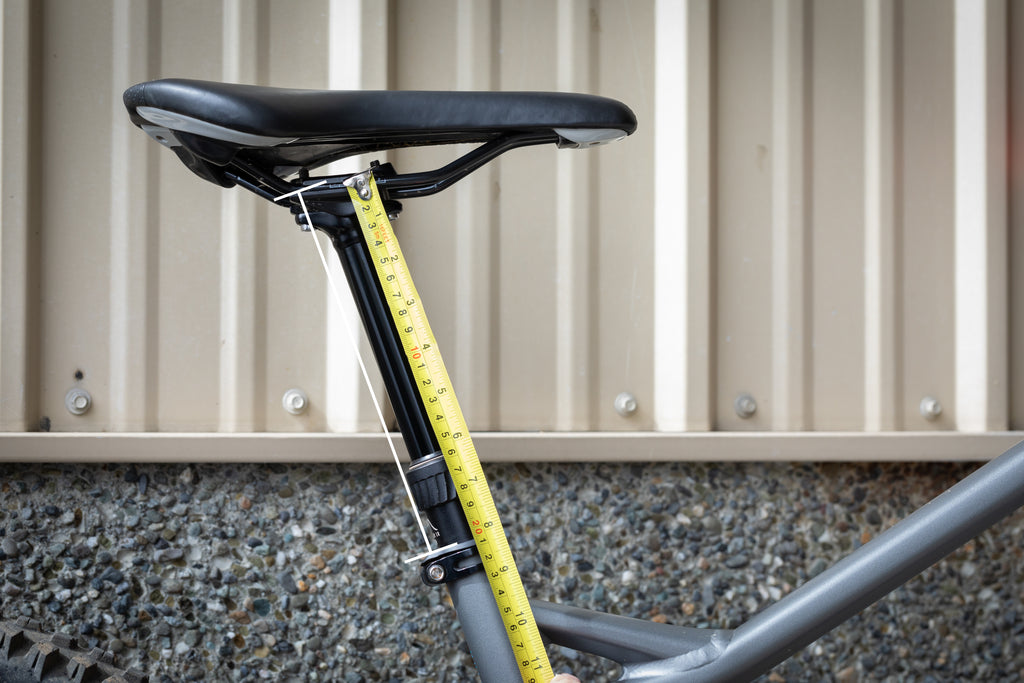
As can be deduced from the name, full extension is the height of your saddle when your dropper post is fully extended, and, ideally, it’s the same saddle height that you will use when climbing. Don’t worry, this measurement still applies to you if you don’t currently have a dropper post. To find full extension, grab a measuring tape and measure the distance between the top of the seat collar to the center of the saddle rails.
Full Insertion
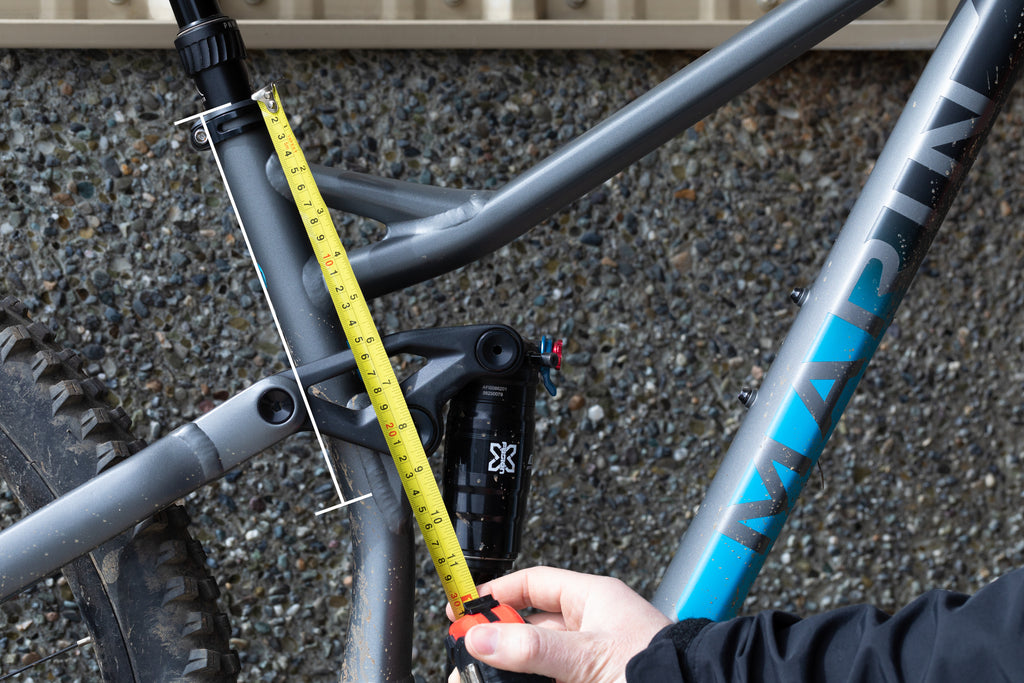
Full insertion represents the distance your seat post can be inserted into your bike before it is obstructed. Examples of obstructions are kinks/bends in the seat tube (such as the one in the Marin Alpine Trail 7 frame pictured below) water bottle cage bolts or suspension linkage. To find full insertion, measure from the top of the seat collar to the top of anything that would obstruct your dropper post’s insertion.
Maximum Overall Length
You probably guessed it, but maximum overall length refers to the maximum length your new dropper post can be if you’re trying to replicate your current setup. Maximum overall length is calculated by adding the previous full extension measurement with the full insertion measurement. Purchasing a dropper post longer than this measurement means the post will either not fit your bike or there will be extra travel you cannot use. If the latter is the case, you will be continually estimating your proper saddle height while riding, which is not a fun experience and can lead to serious discomfort and muscle fatigue.
Choosing the Proper Dropper Post Size
When it comes to choosing the proper dropper post size we have two options for you: consult the sizing charts that we've placed on each of our dropper post product pages, or use our custom Dropper Post Calculator. The second option is much easier and ensures greater accuracy, but we’ll talk about the sizing charts first in case you don’t trust computers.
The Sacred Charts
If you've checked out our dropper posts before, then you’re most likely familiar with the sizing charts. For those of you that aren’t, they look like this:

To choose the correct dropper post, we need to do a few calculations. They’re not difficult but if you’re not a math wiz you may want to jump to the next section about our Dropper Post Calculator. The 3rd Gen. Rainier’s 30mm of tool-less travel adjust makes sizing your dropper a bit more complicated, so first we’ll teach you how to size a dropper that doesn’t have travel adjust.
We’ll start by saying that your measured full extension (MFE) must be greater than or equal to the new dropper post’s “Seat Collar to Center of Rails” figure (on the chart and graphic as “B”). If your MFE does not exceed “B”, you will find yourself continually adjusting your proper saddle height while riding, which is less than ideal.
Here is the golden formula (don’t worry, we break it down below) for finding your properly sized dropper post: D ≦ E - (MFE - B) ≤ MFI
- D = Minimum Insertion Length on chart
- E = Full Insertion on chart
- B = Seat Collar to Center of Rails on chart
- MFE = Measured Full Extension
- MFI = Measured Full Insertion
If you haven’t skipped ahead to the Dropper Post Calculator yet, let’s break down the formula and get started with the math: first, subtract the new dropper post’s “B” value from your MFE. This value represents how far out of your seat tube your new dropper post will have to sit in order to reach your desired saddle height. We’ll call it “X”. Now subtract “X” from the new post’s “E”. We’ll call this “Y”. “Y” equals the total amount of the new dropper post that will be inserted in your bike to reach your preferred saddle height. Next, compare “Y” to your MFI and the new post’s “D”. If “Y” is less than or equal to your MFI and also greater than or equal to “D”, the post will fit your bike and can reach your proper saddle height. If “Y” is greater than your MFI, it will be too long and will exceed your proper saddle height. If “Y” is less than “D”, it is not safe for you to use that sized dropper post on your bike.
Example time! Let’s say we’re replacing the dropper post in the Marin Alpine Trail with our Cascade Dropper Post. From the previous photos we can see that MFE is 205mm and MFI is 230mm. We have a hunch that the 125mm travel option is going to be the right size because the Full Insertion of the 150mm option is greater than our MFI, so “B” is 184mm, “E” is 215mm, and “D” is 90mm. 205 - 184 = 21 therefore “X” equals 21mm. 215 - 21 = 194 therefore “Y” equals 194mm. “Y” (194) is less than our MFI (230) while also being greater than “D” (90), meaning the Cascade 125mm is the proper length to reach this rider’s preferred saddle height and safely fit their bike.
Measuring for the 3rd Gen. Rainier is a bit different as the travel adjust gives you 30mm of wiggle room. Our recommendation is to follow the equation above, but to keep in mind that you can reduce your travel by 30mm if necessary. You can determine whether you can take advantage of a longer post's travel adjust by putting the previous figures into the following formula: (E - MFI) + (B - MFE) ≦ 30. If this equation is proven untrue, i.e. your calculation is greater than 30, then you will not be able to use the travel adjust to eliminate the difference in length and you should consider a shorter post.
Using Our Custom Dropper Post Calculator
Math is hard. Accepting defeat when you accidentally order the wrong size product is even harder. We want to help you find the right-sized dropper post on the first go; so, we teamed up with a private developer to create our industry-leading Dropper Post Calculator. It’s located on all of our dropper post product pages right by the sizing options and is incredibly easy to use.

To use the Dropper Post Calculator, first click on the “Need Sizing Help?” button on the product page of the dropper post that you’re looking to purchase. It’s important to note that each calculator is created with the dimensions of a particular dropper post in mind. For instance, if you’re using the Dropper Post Calculator on the Pine 27.2 Dropper Post page it will only calculate your size for the Pine 27.2 Dropper Post.
Once the calculator is open, you’ll notice that in addition to your full extension and insertion measurements, you also need to know your bike’s preferred seat post diameter. You can find this information either on your frame manufacturer’s website, or stamped onto the bottom of your current seat post.
After you have the diameter of your seat post, simply enter the diameter, full extension, and full insertion measurements into the appropriate fields. Then click “Calculate”, and voila! The recommended size for your preferred dropper post appears above the “Calculate” button, which has now turned into a “Buy My Size” button. In the case of the 3rd Gen. Rainier, the Dropper Post Calculator will even tell you how much travel adjust to use to perfectly reach your desired saddle height.

To exit the Dropper Post Calculator and continue shopping, you can either click the “Buy My Size” button, which will immediately add the calculator’s recommended size of your preferred dropper post to your cart, or use the “X” in the upper right-hand corner. From there it’s back to shopping as usual and you can either manually add your new dropper post to your cart, or move on to our other products for some more sizing wizardry.
Best of luck on your search for your new dropper post. If you're unsure of which dropper post is right for you, check out our recent article that teaches you How to Choose a Dropper Post.
If you need help in finding the perfect dropper post size for your set up, we’re more than happy to lend a hand. Feel free to reach out to our incredible Customer Service team at info@pnwcomponents.com and we’ll work to get you back on your bike in no time.